Ever thought a few DIY tweaks might bring a bit more spark to your kitchen? You might be surprised to learn that small changes, like setting up your pantry with FIFO (first in, first out), grouping similar items, or even swapping out old containers for matching Mason jar bins, can work wonders. These budget-friendly ideas clear out the clutter and boost your kitchen's flow, turning a cramped spot into a cozy, inviting hub. Let’s dig into some simple moves that can free up your space and make it a cheerful place to cook and gather.
DIY Kitchen Organization Ideas for Quick, Budget-Friendly Results

When you're sprucing up your kitchen, keep a few simple ideas in mind. Start by using the first in, first out (FIFO, meaning the oldest items get used first) method in your pantry and fridge. This not only keeps your food fresh but also helps prevent waste. Next, group similar items, like baking supplies or small appliances, into their own work zones. This small trick makes everything easier to find. Finally, transfer ingredients into matching containers, such as Mason jars, to clear up visual clutter and give your space a neat, unified look.
Budget-friendly hacks can really transform your kitchen fast. Even simple DIY projects like adding shelf risers or installing tension rods can boost your storage without costing much. With just a few smart changes, you can create extra space and keep your kitchen both functional and inviting.
- Tension rod spice rack for more condiment space
- Shelf riser installation in cabinets to double available layers
- Mason jar bins for storing dry ingredients and utensils
- Pull-out drawer conversion using rolling baskets for easy access
- Uniform container setups that work perfectly with the FIFO method
Once you’ve tackled these starter projects, focus on setting up zones that match your daily routine. Arrange your cooking supplies, prep tools, and cleaning items so they’re all within easy reach. This simple organization not only speeds up meal prep but also turns your kitchen into a cheerful, clutter-free zone.
Declutter and Zone Your Kitchen: The First DIY Step

Turn your kitchen into a friendly space that works for you. Start by clearing off your counters and emptying the cabinets so you can really see what you have. This simple step lets you decide easily what to keep, donate, or toss. Group similar tools and ingredients together to create clear spots for prep, cooking, and cleaning, which makes your daily routine a breeze.
-
Clear and Categorize
Take everything off your counters and pull items out of your cabinets. Look at each thing and ask yourself if it adds a spark to your kitchen or if it's just taking up space. Sort them into three piles: one for keeping, one for donating, and one for discarding. -
Map Out Your Zones
Grab a kitchen planner (a little sketch of your dream setup) and draw out areas for cooking, prepping, and cleaning. This way, you can design a layout that cuts down on extra movement and feels just right when you’re whipping up your favorite meal. -
Bring Back Only the Essentials
Once you’ve sorted your items, only put back the tools and ingredients you truly use. Arrange them in a logical order that makes each task easy to handle, keeping your space neat and organized.
An organized kitchen means less clutter and a faster meal prep. Enjoy the process and the new, easy flow of your kitchen!
DIY Pull-Out Drawer and Sliding Shelf Upgrades

Pull-out drawers and sliding shelves are like a magic trick for your cabinets. They turn those deep, hard-to-reach spaces into handy storage spots, making it simple to grab heavy items like KitchenAid mixers or Dutch ovens. This upgrade clears out clutter and speeds up your meal prep with a smooth, satisfying slide.
Here are the key parts:
- Rails – They help the drawer move smoothly, similar to how well-oiled parts work in a machine.
- Brackets – They hold everything in place, keeping your pull-out system secure.
- Floor clearance – This makes sure the sliding mechanism moves freely.
- Weight capacity – This tells you how much weight the system can safely hold.
- DIY vs. premade kits – You can choose based on your budget and how much you want to personalize the setup.
When you compare a DIY project with a premade kit, it really comes down to flexibility. If you love tweaking every detail, building your own system lets you adjust rails and brackets to fit your cabinet perfectly. But if you prefer convenience, premade kits come with tested parts that ensure everything works just right, including proper floor clearance and weight limits. DIY solutions often use repurposed parts and can be cheaper, while kits save you time and need less guesswork. Either way, upgrading your cabinets with a pull-out system makes daily cooking tasks easier and brings a little extra joy to your organized kitchen.
Custom Pantry Arrangement Strategies for Maximum Efficiency

Before you jump into a custom pantry project, take a minute to evaluate your space. Measure your pantry, check out its corners, and spot those narrow sections where extra storage could really shine. Look at both the height and depth of your shelves, then decide where stacking shelves and clear bins would do the trick for canned goods and bulk items. This little review sets you up for two fun, practical projects that can bring extra sparkle to your kitchen.
Vertical Pegboard Pantry
Materials: Pegboard, sturdy hooks, small baskets, and hanging shelves.
Steps:
- Measure the wall area of your pantry.
- Securely mount the pegboard along the edge.
- Hang hooks and attach small baskets or shelves to hold spices, light jars, or utensils.
- Arrange everything based on how often you use it for easy access.
Roll-Out Tray Installation
Materials: Sliding trays, rails, brackets, screws, and a measuring tape.
Steps:
- Clear a narrow section of your pantry to get started.
- Install rails along the back wall at the perfect height.
- Securely mount the sliding tray on the rails.
- Fill the tray with bulk items or everyday containers to keep them within reach.
Always keep your items visible. Rotate your supplies regularly and use clear bins so you can easily see when it’s time to restock.
Cabinet and Door-Mounted Rack Inspirations

Ever thought about giving your kitchen a little secret upgrade? Hidden storage ideas not only free up precious counter space but also keep everyday items close by. By adding clever touches like a door-mounted paper towel holder or a mini-shelf made from a tension rod, you turn overlooked spots into useful storage areas without losing style.
Paper Towel Door Rack
Here’s a simple way to add a paper towel holder right on your door:
Materials:
- A paper towel holder
- A mounting bracket or strong adhesive strips
- Screws (if you need extra hold)
- A drill or screwdriver
Steps:
- First, measure the door space so you know which slot will work best.
- Then, attach the mounting bracket securely using screws or adhesive.
- Finally, fix the paper towel holder onto the bracket, making sure it slides with ease.
Pot Lid Hook System
You can also keep pot lids tidy with a few simple hooks. This idea is as straightforward as it is smart.
Materials:
- Tool-free hooks like Command hooks
- A measuring tape to get your spacing right
- A level for making sure everything aligns perfectly
Steps:
- Start by finding the best spot inside your cabinet door.
- Next, line up the hooks evenly along the edge for balanced support.
- Press the hooks firmly into place so they’re ready to hold your pot lids.
Recycling Bag Holder
Turn a repurposed item into a handy holder for recycling bags or cleaning supplies. It’s a neat little trick to organize your space.
Materials:
- A shoe organizer or a small bin that hangs on a door
- Over-door straps or hangers
- Some cleaning wipes to tidy up if needed
Steps:
- Pick an organizer that fits well on your door.
- Hang it securely, making sure the door isn’t damaged.
- Slide in your recycling bags or cleaning supplies for easy reach.
These creative projects don’t need heavy-duty tools, making them a fun and simple way to tidy up your kitchen. Enjoy turning your unused spaces into clever storage solutions!
Handmade Drawer Organizer Solutions

Ever peeked into a messy drawer and thought, “There’s got to be a better way”? Custom drawer organizers can work magic by turning clutter into a neat, personal station. They’re made to fit your utensils, spice packets, and gadgets perfectly, so every piece gets its own little home.
Here are some fun, DIY ideas you can try:
- Container lid rack: Use a cooling rack, a shallow bin, and some screws to fix the rack above the bin.
- Diagonal divider: With a bit of thin wood or sturdy plastic, a saw, and some adhesive, you can build a slanted divider that fits just right.
- Spice packet slots: Small cardboard tubes, a craft knife, and glue are all you need to create neat compartments for your spice packets.
- Adjustable dividers: A foam board, adhesive strips, and a cutting tool let you set up sections that change as your needs do.
- Utensil trays: Repurpose old trays by adding non-slip liners, a few brackets, and a measuring tape to ensure a perfect fit.
- Flatware caddy: Combine small baskets, plastic dividers, and labels from a label maker, and you’ve got a great system for your cutlery.
These projects are super simple and add a touch of order to your kitchen. Label every section so you can easily find your favorite spoon or spatula. And as your kitchen tools change, just adjust the dividers to keep everything working for you. Enjoy the process and the little boosts of joy that come with every well-organized drawer.
Space-Saving Shelf and Countertop Solutions

Shelf risers and lazy Susans are smart tricks that add more storage layers while keeping your favorite items within reach. Shelf risers help you build extra space on your counters or in your cabinets by creating a second level for plates, bowls, or even that beloved cookbook. And lazy Susans? They make it easy to grab oils, spices, and other must-have ingredients right from your countertop so nothing gets lost in the back.
Upcycled containers offer another wallet-friendly way to stay organized. Imagine turning old boxes into handy drawer dividers to neatly sort your utensils, or using egg crates to design custom storage in your fridge. Even mason jars can become useful bins for keeping pens, small gadgets, or dry goods. With a little paint or creative labeling, these everyday items transform into charming and functional organizers that add a splash of personality to your kitchen.
Open shelves do double duty by looking great and keeping things within easy reach. They let you display your favorite dishes and cookbooks while keeping the items you use daily right at your fingertips. Enjoy the mix of practicality and style, and let each shelf brighten up your kitchen like a little treasure trove.
Multi-Functional Island and Rolling Cart Projects

When you're dreaming up a new kitchen setup, choosing the right island or rolling cart is like finding that perfect spice that elevates every meal. You want something that not only fits your style but also keeps your space clear and organized. Look for an island with built-in shelves or drawers to hide away clutter and keep your must-have tools right at hand. A utility cart does the trick too, it can turn into extra storage for your bulk items, cookware, or even serve as a chic little bar station. It should match your decor and glide effortlessly when it’s time to clean or rearrange. Imagine having your everyday items perfectly organized and always within reach.
- Under-counter drawers for streamlined storage
- Side pegboard panels to hang frequently used tools
- Hanging hooks for utensils to keep them visible and ready
- Removable trays that offer flexible, temporary organization
These smart upgrades let you arrange your kitchen exactly how you like it, and a mobile island or cart makes cleaning and tweaking your layout a total breeze.
Decorative Jar Placements and Upcycled Container Hacks
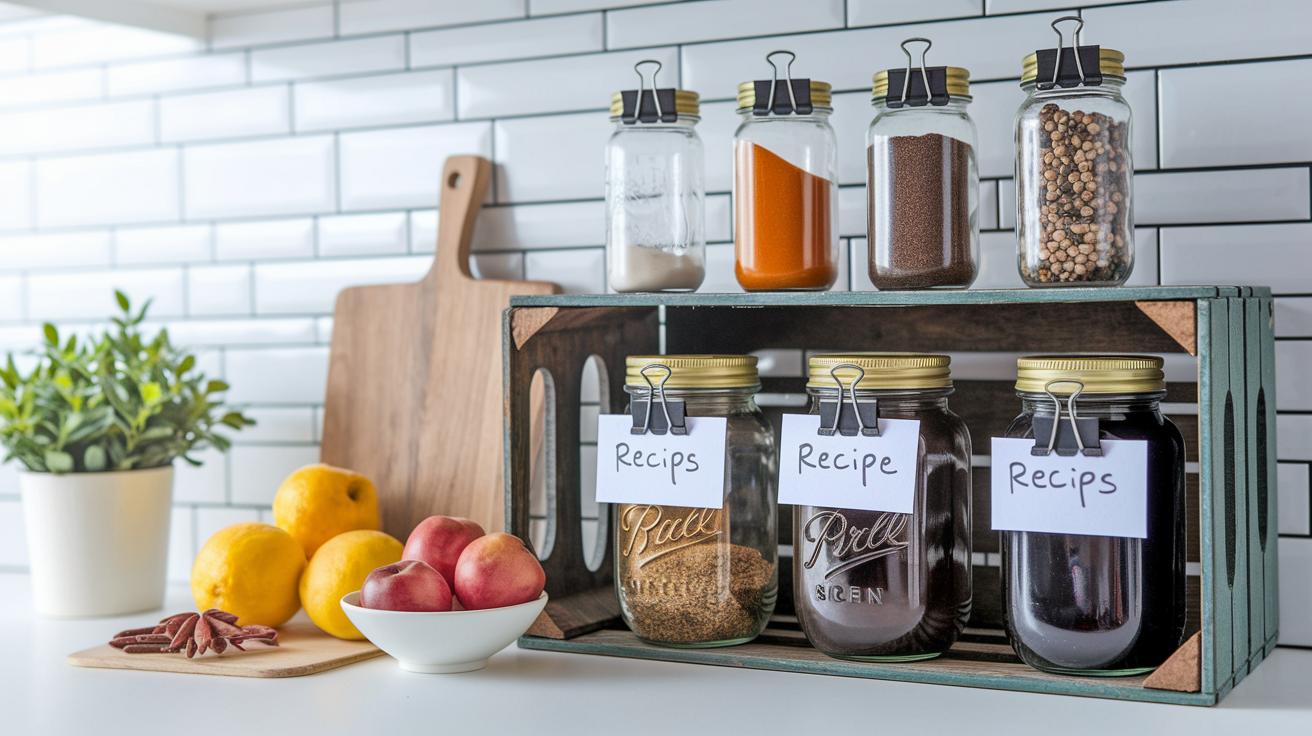
Mason jars add a playful, homey touch to your kitchen while keeping your everyday items neatly in place. They work great for grouping your favorite utensils, snacks, or spices on open shelves or in drawers. Because they’re clear, you can quickly see what’s inside and know when it’s time to restock. It’s like having a tiny exhibit of your culinary gems, you know, a jar bursting with colorful spices that inspires you every time you cook.
Vintage crates are another cool trick to organize your space. These old-fashioned boxes can be given a new life as stylish storage bins for cookbooks, towels, or even seasonal produce. Pair them with your clever jar setups and you’ve got a kitchen that’s both practical and pretty. It’s a simple swap that makes your space feel refreshed and uniquely yours.
Here are a few fun ideas to get you started:
- Use binder clips on jar lids to hold recipe cards and create a rotating spice display.
- Attach egg cartons behind jars to sort small items neatly.
- Arrange jars in layers for a mini station to keep your utensils handy.
- Paint vintage crates in bright shades and organize your cookbooks by color.
These tips mix eco-friendly habits with chic style, making your kitchen look good and feel even better.
Final Words
In the action, we explored simple, budget-friendly ways to transform your kitchen. From FIFO pantry techniques and grouping similar items to decanting with Mason jars, the tips bring clarity and ease.
We covered projects like pull-out drawers, vertical pantry tweaks, creative cabinet racks, custom drawer organizers, and space-saving shelf ideas. Each idea aims to create a convenient workspace while infusing your kitchen with personality and practicality.
Keep experimenting with these DIY kitchen organization ideas, you’re well on your way to a more efficient, inspiring home kitchen. Enjoy every moment!
FAQ
What are some kitchen organization ideas for small spaces and on a budget?
Kitchen organization ideas for small spaces involve using affordable hacks such as shelf risers, tension rod spice racks, and Mason jar bins to maximize storage without major remodels.
What kitchen organization products can enhance storage in tight kitchens?
Kitchen organization products like pull-out drawer systems, cabinet-mounted racks, and decorative organizers offer smart, ready-to-use solutions that boost accessibility and style in any small kitchen.
How can I organize my kitchen DIY?
Organizing a kitchen DIY means clearing surfaces, grouping similar items into work zones, and creating budget-friendly solutions like homemade drawer dividers to simplify your cooking space.
How do I organize a kitchen without a pantry?
Organizing a kitchen without a pantry includes repurposing cabinets with stackable bins and adding pull-out trays so you can efficiently store dry goods, ensuring every item has its place.
How do I decide where to put things in my kitchen?
Deciding where to put things in your kitchen means grouping similar items and establishing dedicated zones so that frequently used tools remain within easy reach for a smoother workflow.
How can I add a pantry to a kitchen that doesn’t have one?
Adding a pantry to a kitchen without one can be achieved by converting a small closet or unused cabinet into a pantry with adjustable shelves, making bulk items easy to organize and access.